Quantcast
Channel: culinaryxpress
Viewing all 102 articles
Browse latest View live

No Bake Strawberry Cheesecake

$
0
0
With a creamy top and buttery biscuit base, who can resist this classic dessert ... No-bake Strawberry cheesecake. Cheesecake is a sweet dish consisting of one or more layers. The main, and thickest layer, consists of a mixture of soft, fresh cheese (typically cream cheese or ricotta), eggs, and sugar; the bottom layer often consists of a crust or base made from crushed cookies or digestive biscuits, graham crackerspastry, or sponge cake. Cheesecake is usually topped with fruitwhipped creamnuts, fruit sauce, or chocolate syrup.
 
Cheesecakes are made in different parts of the world using different ingredients  such as, United States and Canada use cream cheese; in Italy, cheesecakes use ricottaGermany, the Netherlands, and Poland use quark. Cheesecakes are most easily baked in a leak-proof spring form pan, often paired with a water bath to more evenly distribute the heat. Cheesecakes can be broadly categorized into two basic types: baked and unbaked.


Whether you make a bakes or no bake cheesecake, you will come across cream cheese— a very important ingredient in cheesecake.  Many recipes recommend for Philadelphia Cheese, which makes the Cheesecake  silky and shiny. But it is not a product that is easily available in many parts of the world, so making it at home is the only option you will have. Actually it’s pretty easy to make. You can learn how to make Cream Cheese at home Here.
 
Besides the cream cheese , you will be needing heavy cream or sour cream to help in  softening the texture of the cheese and adding some moisture. Adding  sour cream will give you the extra hit of sour tang  to the cake but in this recipe I have added the fresh cream.Coming  back to my recipe , Today I want to share an easy Cheesecake recipe which requires absolutely no baking and is delicious and refreshing.This Cheesecake I have made for our 26thFoodie Monday Bloghop theme of “ Valentine’s  Recipes”.
 
Cheesecake topped with bright, sweet strawberries is a flavor that never gets out of fashion! These two flavors work perfectly together, as the balance of creamy and rich plus juicy and sweet only work to enhance each other, especially when Valentine’s Day is around the corner. This  cheesecake topped with a generous layer of strawberry preserves where each slice is packed with loads of creamy filling, graham crust and sweet strawberries for a taste of summer. 
 
Is your mouth watering yet? Without further delay, let’s move on to the recipe:
Recipe Type: American
Course: Dessert
Prep Time: 10 minutes
Cooking Time:40 minutes

Ingredients:
  • 200gm digestive biscuits
  • 100gm unsalted butter melted
  • 75gm   pistachios and walnuts
  • 200ml fresh cream
  • 200 ml cream cheese at room temperature
  • 2 teaspoon Gelatin
  • 100gm icing sugar
  • 2 tablespoon strawberry coulis
  • 1 teaspoon Rose water
  • 250 gms strawberry
  • 50gms granulated sugar
  • 7 inch Loose Bottomed cake tin

 
Let's Learn how to make this No Bake Strawberry Cheese cake:
  • Melt the butter and keep aside.  
  • Place the Digestive Biscuits on a ZIP bag and with the help of a rolling pin crush the biscuits into fine crumbs.
  • Now crush the Pistachios and walnut and  add  the same to biscuits  . Now add the melted butter and mix everything until well combined. 
  • Pack this mixture firmly into a loose-bottomed cake tin, spreading out with the back of a spoon so that it is evenly distributed and coming slightly up the sides of the tin.  Chill until needed.
  • In the meantime cut the straw berries and grind in a blender.
  • Strain the juice  into a saucepan.  Add a few tbsp of icing sugar, to taste.  Gently heat until you have a thick, but still drizzle-able coulis. Allow to cool completely.
  •  Meanwhile, soak the gelatin in a small bowl of water for 5 min.  Pour the cream into a pan and bring to a simmer then remove from the heat.  Squeeze any excess water out of the gelatin and add to the warm cream, stirring until dissolved.  Allow to cool slightly.
  • Beat 100g of icing sugar into the cream cheese along with the 2 tablespoon of Strawberry coulis and Rose water. 
  •  Add the gelatin cream along and beat until smooth.
  • Pour the cream cheese mixture into the biscuit base and refrigerate for 6 hours or overnight, until set.
  • Before serving Spread a generous layer of strawberry coulis on top and serve .

 Rounding up my experience of making my first cheesecake is this beautiful surprise from my son which I could not resist but share with you. While I was Photographing this , I asked him to take a bite and share his comments on how it is being done and he came up with this beautiful message and an empty plate.....That says it all......
Happy Valentine's Day Readers......


Caramel Custard / Baked Caramel Pudding / How to make a Perfect Caramel Custard

$
0
0
Caramel custard, Crème caramel, flan,flan de leche, banh caramel, kem flan is just different names of the custard dessert with a layer of soft caramel on top. This dish is is a very popular dessert and is quiet simple to make. The best thing about this dessert is that it not only tastes great but needs just a few ingredients which is commonly available in most of the homes.
 
Flan or caramel custard  is always the best sweet treat served very often during family dinner and everyone love it, so do i. I love it’s silky texture, the glossy shiny look, the colors and the feeling of  melting slowly in your mouth  is just worth giving this dessert a try at your home.

CuisineInternational
Recipe TypeDessert
Prep Time : 15 mins
Cook Time : 30 mins 
Serves: 2
Ingredients: 
  •    3 nos of Eggs
  •    1 1/2 cups of Milk 
  •    1 tsp Vanilla essence 
  •    A pinch of Nutmeg powder
  •    3 tbsp of powdered Sugar 
  •    1/4 cup granulated Sugar for caramelizing 
  •    1 tablespoon water
  •    2 Ramekins or any mold
   
Let's Learn how to make this Caramel Custard:
  • Pre-heat the oven at 180 degrees C for 15 minutes.

  • Take 1/4 of granulated sugar  in a pan, add a tbsp of water and heat on medium flame. Stir only until the sugar dissolves and then wait for the sugar to caramelize . Once it starts changing color,  do not stir rather gently swirl the pan for even coloring .
  • Donot let the caramel to turn too dark, or else it will taste bitter and have a burnt smell. 
  • Pour the prepared caramel evenly into individual ramekins or moulds. Make sure that the base of the ramekin is well coated. Allow it to set for 15 minutes.
  • Break 3 small eggs into a bowl, add a tsp of vanilla essence, a pinch of nutmeg powder and 3 tablespoon of of powdered sugar or castor sugar. Whisk using a wire whisk until frothy.
  • Strain the mixture to give the custard a smooth texture and to remove undissolved egg white strands if any and leave it to cool. 
  • Then pour the milk-egg mixture into the prepared ramekins. Cover it with Silver foils.
  • In a Baking tray, add a cup of water and place the ramekins in it and bake in a pre-heated oven for 30 minutes or until a toothpick inserted in the center of the custard comes out clean.
  • Let it cool for sometime and simply demould the custard from the ramekins and serve.

Wholewheat Banana Bread with Chocolate Ganache and Hearts

$
0
0
Whenever I pass the display of bananas in the departmental store, I never forget to pick them up. My love for Banana always ends up in piling of Bananas in the fridge. So the best way to use the over ripe banana is to make them into Banana bread which is a type of cake made with mashed bananas, and typically cooked a loaf shape. It is often moist, sweet, and can be described as a quick bread. This classic banana bread is fluffy, moist, infused with sweet banana flavor, and loved by kids and adults alike.
 
I love this bread's moist texture and simple flavor. Banana bread should form a crack down the center as it bakes--a sign the baking soda is doing its job.“This Moist, delicious whole wheat banana bread is perfect for a Valentine’s Day treat.”This bread I bake often and is a perfect Tea time accompaniment for me. I decided to use the banana bread I bake often in making a sweet surprise cake for my Son. He loves Chocolate and for his late night cravings, it seems perfect. Without a delay, let’s check how did I make this cake. 

Recipe Type: Dessert
Serves: 4
Prep Time:10 minutes
Cooking Time:60 minutes

Ingredients for the Banana Cake:
  • 1 ½ cup Whole Wheat Flour
  • 4 nos of ripe banana
  • ½ cup castor sugar
  • ½ cup oil
  • a pinch of nutmeg powder
  • 1 teaspoon Baking Powder
  • ½ teaspoon baking Soda
  • a pinch of salt
  • ½ cup milk at room temperature
  • 1 teaspoon coffee powder
  • 1 teaspoon cocoa powder

Ingredients for the Chocolate Ganache:
  • 1 cup dark Chocolate
  • ½ cup fresh cream
Ingredients for the Chocolate Heart:
  • ½ cup white or milk chocolate
  • 1 teaspoon oil
  • Parchment paper
  • few strawberries for garnishing
  • 1/2 cup sugar syrup

Now Let’s Learn how to make this cake:
  • Preheat the oven to 180 degree celsius.
  •  Grease a bread tin or a rectangular cake pan with some oil.
  •  Sieve the flour with the baking soda, baking powder, salt, nutmeg powder, coffee powder, and cocoa powder.
  •  Cut the bananas into slice and mix with sugar in a mixing bowl. Mash the bananas well or puree them with a hand blender.
  •  Now add the oil to the banana and mix well.
  •  Fold the flour directly in the bowl containing the mashed bananas and mix everything really well with the milk.
  •  Pour the bread mixture into the loaf pan and bake at 180 degree C for 30-40 minutes or till a toothpick inserted in the bread comes out clean.
  •  Once warm or cool remove the bread from the pan. Slice and serve banana bread warm.
  •  The remaining loaf, you can wrap in a cling film or keep in a box in the fridge.
  • For the Chocolate Ganache, break the dark chocolate into a bowl.
  • In a pan pour the fresh cream and warm till bubbles appear in the sides. Turn off the heat and pour on the chopped chocolates. whisk them  till the chocolate melts completely.
  • Now slice the banana bread and take one slice of it and pour a teaspoon of sugar syrup on it.
  • Spread a teaspoon of chocolate ganache and place one more bread slices. Repeat the process for two more layers.
  • Now cover the bread slices with chocolate ganache and keep in the refrigerator overnight.
  • For the chocolate hearts, melt the white chocolate on a double boiler and when it melts completely, add a teaspoon of oil in it and whisk well.
  • Pour it into a piping bag, and on a parchment paper make some little hearts and let it cool. Once cool, take the hearts out of the    parchment paper and keep aside.
  • For assembling the cake, take out the cake from the fridge and pace the hearts over it along with some sliced strawberries and serve.


NAVARATAN KORMA

$
0
0
Starting this Monday, we are into our 27th Foodie Monday Blog Hop event and the theme for this Monday is North Indian Cuisine. North Indian cuisine is a part of Indian cuisine, from the region of Northern India and includes the Awadhi cuisine, Bihari cuisine, Bhojpuri cuisine, Kumauni cuisine, Cuisine of Kashmir, Mughlai cuisine, Punjabi cuisine, Rajasthani cuisine, Cuisine of Uttar Pradesh. North Indian cuisine has had strong Central Asian influences as compared to its southern or eastern counterpart.
North Indians and their food are inseparable. The role of food in Northern India is not just to satisfy hunger pangs but a lot more than that. Northern Indians take their food very seriously and cooking it is no less than a ritual when compared to other parts of the country, where you can still hope to make yourself a quick meal without indulging in elaborate procedures. The North of India is centre of some of the best culinary delicacies and varieties of food. 
North Indian cuisine is distinguished by the proportionally high use of dairy products such as milk, paneer, ghee and yoghurt . Gravies are typically dairy-based. North Indian cooking features the use of the "tawa" (griddle) for baking flat breads like roti and paratha, and "tandoor" (a large and cylindrical charcoal-fired oven) for baking breads such as naan, and kulcha; main courses like tandoori chicken also cook in the tandoor.
So going by the today’s theme of North Indian Cuisine, my   pick is a very popular dish amongst North Indians. This exotic Mughalai cuisine inspired preparation is known as ‘Navaratan Korma. ‘Navaratan’ means nine jewels and ‘Korma means a silky buttery sauce which is very smooth in texture.This dish is supposed to contain a mix of 9 fruits, vegetables and fried nuts. In true Mughlai cuisine fashion, cream (or cashew nut paste) is added to form the gravy. This is different from the less rich coconut based mixed vegetable curry from South India.
Before learning the recipe for this korma, a little bit of background and history of this needs to be told. “Navratan” is an amalgam of the words “Nav” meaning nine and “ratan” meaning gems or precious stones. The most famous of the Mughal rulers was Akbar the Great . Despite being illeterate,  Akbar liked to be surrounded by intelligent and talented people. He appointed 9 such people who were also his advisers and friends and he called them “Navratan” or his nine gems. This dish is named Navratan korma as it contains 9 different, pretty components. The gravy itself is pale so as to allow  “9 gems” to stand out. 

Cuisine: Mughlai

Prep Type: 30 minutes
Cooking Time: 20 minutes

Serves: 4


Ingredients:

The vegetables

  • 2 medium carrot, cut into 1cm cubes
  • 4  cauliflower florets
  • 8 to 10 thin, long string beans, cut into 1cm pieces
  • 1 medium potato, cut into 1cm cubes
  • 1/4 cup green peas
  • 1/4 cup paneer, cut into 1cm cubes
The spices
  • 2 to 3 green cardamom
  • 1 black cardamom
  • 3 cloves
  • 1 inch stick of cinnamon
  • 1 bay leaf
  • 2 single strands of mace
The Korma

  • 2 medium sized onions, sliced or ½ cup thinly sliced onions
  • 2-3 green chilies chopped
  • ½ tbsp ginger garlic paste
  • ½ cup fresh curd
  • ⅓ cup fresh cream
  • ¼ to ½ teaspoon of garam masala powder
  • ½ teaspoon turmeric powder
  • 1 tsp red chili powder
  • 1 tbsp coriander powder
  • 2 tbsp ghee
  • 1 cup water or add as required
  • salt as required
The Mughal richness

  • 1 tbsp poppy seeds
  • 1 tbsp melon seeds
  • 10 to 12 almonds
  • 10 to 12 cashewnuts
  • ¼ cup warm water for grinding to a paste or as required
The garnish

  • 1 tbsp ghee
  • 10 pistachois
  • 10 cashewnuts
  • 10 walnut halves
  • 1 tbsp raisins
  • ½ cup chopped pineapple
  • ½ tbsp melon seeds
  • 1 tbsp mint leaves
  • a pinch of saffron strands

Let's Learn How to make the recipe:
Preparing the paste:

  • Soak all the dry fruits and seeds in hot water for 30 to 40 minutes.Remove the peels from the almonds and add the peeled almonds in a grinder .Add ¼ cup water and grind the poppyseed, melonseed, almonds, cashewnuts to a fine paste. Add more water if required while making the paste. keep this paste aside.
  • In the meanwhile, cut the vegetables and steam in a steamer for 5 to 7 minutes, till they are half done. Transfer to a sieve and wash them in cold water to retain its firmness.

Preparing the korma:

  • Heat ghee in a pan. Add the whole garam masala and fry till they crackle and become aromatic.
  • Add the sliced onions and saute them till they turn golden.Now add the ginger-garlic paste and chopped green chilies, saute till the raw aroma of ginger-garlic goes away.
  • Now whisk the curd well and keep it ready.Next add the ground paste and curd. stir well. Add turmeric, coriander powder and red chili powder and  stir well for 3 to 4 minutes on a low flame.
  • Now  add the vegetables with 1 cup of water. Season with salt and mix well.Cover and simmer the veggies till they are cooked. Check as they are half cooked earlier. Once the veggies are cooked, add the cream and stir it with the rest of the korma, switch off the flame. Sprinkle garam masala powder and keep aside.

Preparing the garnish:

  • Heat 1 tbsp ghee in a small frying pan and saute the cashews,pistachios, walnuts  till they turn a pale golden.
  • Now add 1 tbsp raisins & ½ tbsp melon seeds. saute for some seconds.
  • Then add ½ cup chopped pineapple cubes. saute for a minute.
  • Next add 1 tbsp mint leaves, a pinch of saffron strands and saute for half a minute.
  • Garnish the korma with the sauteed garnishing ingredients. 
  • Serve Navratan korma with jeera rice for a blissful taste of this wonderful North Indian Cuisine.

Linking this recipe to our 27th Foodie Monday Blog Hop theme of North Indian Cuisine


SPARKLING MINT GINGER LIME COOLER

$
0
0

When it’s really hot, you want something to cool you down, right? Lime, mint, and ice are three things that will get you there quickly. This refreshing drink will definitely cool you off on those hot days of summer and you will just feel light, clean, and refreshing.

Summer here is so hot and humid and I find myself craving for all sorts of frosty refreshment. Typically, I look to different drinks that truly quenches my thirst. There is something appealing about a glass filled with something cold  and a bit bubbly. 
Mint ginger lime cooler is a refreshing and healthy drink, apt for the scorching summers. This cooler has the tanginess of lemon, flavor of mint leaves with subtle ginger. To celebrate the arrival of summer, I made this Ginger Mint Cooler using ginger, fresh squeezed lime juice, mint from my kitchen garden and sparkling water. 

Poured over ice, it made a healthy refreshing drink. Ginger is sweet, it’s savory, and it’s spicy, all at the same time. Besides being tasty and helping to aid digestion, ginger is also known for it’s anti-nausea benefits. It has also been used for centuries to reduce inflammation. With a little lime and fresh mint, this Ginger Mint Cooler is the perfect drink for a summer day, or for any time of the year. The combination of ginger and mint can never go wrong. 
Cuisine Type: Appetizers
Prep Time: 10 minutes
Serves:2

Ingredients Needed:


  • 1 inch piece of peeled fresh ginger, grated on micro plane grater
  • A fistful of  coarsely chopped fresh mint leaves
  • 1/2 cup fresh lime juice 
  • 4 cups sparking water or club soda
  • 1/2 cup sugar
  • Pinch of salt
  • Pinch of freshly ground black pepper
  • Mint and Lime wedges for garnishing
  • Ice cubes 
Lets Learn How To make this refreshing Summer Drink:

  • Grate the ginger on a micro plane grater and keep aside.
  • Wash and chop the mint leaves.
  • Cut 6 to 7 lemons and squeeze the juice out of them and keep aside.
  • In a blender, blend together all the ingredients, except ice.
  • Place couple of ice in the serving glass and strain the juice over it.
  • Serve immediately with lemon wedges and mint leaves.

Besides this ,you can have a look at other Thirst Quenchers like    Pomegranate lemonade,  STRAWBERRY ORANGE AND SOY SMOOTHIE,  Mango LassiWatermelon Lemonade,  Green Smoothie,  Bael ki Sarbat to beat the summer heat.


CHILLED MELON BALLS SALAD

$
0
0

“Summer Is Here, Let’s Give it a Big Cheer!”Yesterday was a hottest day and the sun was on full swing. Due to drastic change in weather, I felt little tired. Keeping the weather in mind, I thought of doing something with fruits.Watermelon is a summer fruit, It has plenty of Water and are great way to hydrate. The nature of watermelons is generally rather chilling and contains a great deal of moisture. Did you know that watermelons are 92% water. This salad is quite ideal for weight watchers as it is a good source of potassium, iron and many traces of minerals also. 
 
Nothing surpasses the fragrant, sweet flavor of a ripe melon, but finding a good one can be tricky. Most melons are at their best from early summer. For me, summertime is synonymous with light and refreshing dishes – and this Melon Balls with pepper and lime dressing fits the bill perfectly.  I have  made a simple fruit salad of watermelon, and cut the melon into balls using a melon scooper – then made it so much deliciously better by adding our homemade lime and pepper dressing!
There's nothing better than biting into a juicy piece of fresh watermelon on a hot, summer day. You can incorporated the sweet flavors of this luscious melon into a variety of drinks, salsas, salads, and more that are perfect for any warm-weather gathering also.

Recipe Type: Salad
Prep Time: 10 minutes
Serves:2

Ingredients:
  • 1/2 watermelon
  • 11/2 teaspoon of lemon juice
  • 3 to 4 black peppercorns, crushed
  • 1 tablespoon roughly chopped fresh mint leaves
  • Black Salt to taste
  • Melon Scooper
Let's learn How to make this salad:

  • Using a melon scooper, scoop out small balls from the watermelon. Discard all the seeds.
  • Keep the melon shell for serving.Give the melon shell a Zigzag edge using a small sharp knife.
  • Place the melon balls in the refrigerator to chill thoroughly.
  • Mix together, lemon juice, crushed peppercorn, black salt  thoroughly.
  • pour over the melon balls and toss gently once or twice to mix.
  • Scoop into the melon shell and serve immediately.
  • Sprinkle the chopped mint leaves on top and serve.

Watch out for this space for more summer dishes ...Till then.....Keep Cooking....


STUFFED DATES TOFFEES

$
0
0

Hey, we are once again back with our 28th Foodie Monady Bloghop event and what a fun choosing the theme for this time. It's always a pleasure to visit my co-blogger friends blog and see what amazing recipes they have....and when the theme for this week was " Inter Blog challenge", everyone including me were excited. This is the chance to cook something from each other's blog but wait who will cook from whose blog was the question in everyone's mind. Here comes the savior of our group Krithika ...the lively girl that she is always has surprises up her sleeves.....and comes this unique way of choosing the Blog by picking up a random draw. Personally, I would have been happy to cook from anyone's blog as I know each one of them are fantastic cooks and passionate Bloggers. I have been given to try recipes from a very talented and sweet friend Habeeba Nisa who blogs at Flavour Diary .
Nisa is born and raised in India and moved to UK with her family consisting of her hubby and two extremely sweet kids. She is a Software professional and was working  before she left India and currently work with her husband in his Company. Her Blog has  a collection of wonderful recipes to cook from. I have personally used one of her recipes of Chocolate cups in SPICY CHOCOLATE MOUSSE. Apart from this, some of the dishes which I like from her blog are Cute Deviled eggsChocolate Cardamom SandeshDahi Vada . 
Spicy Chocolate Mousse
For this 28th Foodie Monday Blog Hop I have chosen this very easy and flavorful recipe of Stuffed Dates which can be done in both sweet and savory manner and like her I also tried the sweet version. You can have a look at the original picture of the recipe below. 

             
Here is what NISA has to say about her recipe: "Why to have just dates for your snack, why not have them with little more added vitamins and minerals. These lovely tiny energy bundles are easy to make and serve. Having a date a day would be satisfying to your taste buds with sweetness and also giving you all the essential nutrients for the day.  Its a blending and stuffing process".
Dates are the fruit of the date palm tree, and are often used as an ingredient in desserts and other recipes, naturally sweetening dishes and offer several nutritional benefits. Dates has been gaining popularity with more health conscious consumers who looks into the fact that dates can easily be used in cooking and baking to sweeten dishes, sometimes even taking the place of sugar or other artificial sweeteners.
The health benefits of dates are far-reaching, but one of the best things about the natural fruit is that although it is high in sugar, studies have shown that dates are actually a low-glycemic index food and do not significantly raise blood sugar levels after they are eaten. Dates are also loaded with fiber, have been shown to lower triglyceride levels, and deliver vitamins and minerals that are necessary to maintain optimum health.
Coming back to the recipe of Stuffed dates, it is an easy but impressive recipe with loaded goodness of dry fruits. This recipe is equally well-suited for an elegant dinner party or a  summer get together, as it balance sweet, nutty and crunchy flavors and  textures.I have made a few changes in the original recipe which I have marked in the Note.
Level: Easy 
Total time: 30 mins
Makes: 50 nos


Ingredients

  • 2 packets dates
  • 100 grams Almonds
  • 100 grams Cashewnuts
  • 2 tablespoon Raisins
  • 1 tablespoon melon seeds
  • A pinch of Nutmeg powder
  • 1 tablespoon Milkmaid
  • 100 grams chocolate chips(Optional)
  • Few Cloves for garnishing

Lets learn How to make this:

  • Cut the Dates in half and remove the seeds. You can also seedless dates.
  • Dry roast the  Almonds, Cashewnuts and melon seeds separately. 

  • In a blender add Almonds, cashews and blend it to a coarse powder.Add the melon seeds and nutmeg powder to it.Now add 1 tablespoon of milkmaid and knead it to make a dough consistency.Take a pinch of this mixture and stuff it inside the dates. Place a clove in the center and keep aside.The flavor of the clove and its spiciness will balance out the sweetness of the stuffed dates.
  • You can have this as it is now or can follow the below mentioned procedure to make it more exotic.


  • Now melt the chocolate chips  in a double boiler and mix it well. Once it melts add a a teaspoon of oil to make it smooth and easy coating of the dates.Dip each stuffed dates in it and keep on a parchment paper to dry. Place it inside a refrigerator to cool .Once cool, take out the dates and wrap it on color papers like toffees. You can have them as it is or can pass it off as a gift to someone you LOVE.
 This is such an easy to make recipe once you figure out a couple of basics, that you can easily make a few batches within  half an hour or so and have delicious gifts to share with friends and family or to serve throughout the holiday season.Believe me when I say you can make this and then invite people over for a tasting of this. Otherwise, you’ll be tempted to eat it all yourself. Promise.
 I have made the following few changes in the basic recipe adopted from Flavour Diary


  • The original recipe calls for sugar and water , whereas I have replaced it with Milkmaid for proper binding in place of water.
  • The original recipe calls for addition of food colors whereas I have kept it basic.
  • I have dry roasted the almonds and cashew nuts for longer life .
  • Kept the mixture a bit coarse so that it can give the feeling of chewiness.
  • I have used melon seeds for crunchiness and nutmeg powder for aromatic flavor.
  • I have used chocolates to cover the dates for a kids friendly version and kept it as it is for others.

Thank you Nisa for this wonderful and simple recipe and if I could have met you in person, I would have definitely gifted you the lovely stuffed dates wrapped up in chocolates for you and your kids.


Sending this Stuffed dates toffees recipe to our 28th Foodie Monday Bloghop theme of " Inter Blog Challenge".


CAPSICUM PANEER

$
0
0
Paneer
Good Food is very often Simple Food....How true to it's nature. Simple food is always so soul satisfying. After a hard day's work, nothing satisfies like a bowl of hot steaming rice and a flavorful curry to go with.Many a times, I faced the question from most of my readers, that how do I manage to work and cook regularly and share at regular interval. This is simple, I do a lot of pre-planning, like menu planning one day in advance and makes sure my refrigerator has all the basic ingredients to whip up a quick satisfying meal. One such dish is Capsicum Paneer which is fairly easy and quick to make.
Paneer
Paneer is the star ingredient in some of my most favorite Indian dishes — and probably yours too. Paneer is home-made, unsalted, white cheese which is fresh and has a dense, crumbly texture that goes beautifully with any spices.This paneer capsicum is a gravy recipe made with marinated yogurt . The addition of yogurt gives a good flavor to this recipe and overall it is a rich creamy recipe which goes best with rotis, parathas or even a simple jeera rice.Although the taste is tangy you could also make them more spicy if you wish. When you're looking at making something quickly for lunch or dinner — which is healthy too, here's a recipe which can be a quick solution.

RECIPE TYPE: Main Course
CUISINE: Indian
PREP TIME:  30 mins
COOK TIME:  20 mins
TOTAL TIME:  40 mins
SERVES: 4


Ingredients for Marinating Paneer:

  • 200 gms Paneer cut into squares
  • ½ cup hung yogurt 
  • 2 tsp kashmiri red chili powder 
  • 1 tsp dry mango powder 
  • 1/4th tsp chat masala
  • 1 tbsp gram flour 
  • 1 tsp garam masala
  • 2 tsp oil
 Ingredients for the gravy:
  • 3 tbsp oil 
  • 1 tsp carom seed 
  • 1 onion chopped into squares 
  • 1 cup green, yellow and red bell pepper chopped into square 
  • 2 tomatoes finely chopped 
  • 1 tbsp grated ginger or chopped finely 
  • 1 tsp chopped green chili 
  • 1 tsp roasted cumin powder 
  • 1 tsp kashmiri red chili powder 
  • 1 tsp coriander  powder 
  • 1 tsp garam masala powder
  • ¼th tsp turmeric powder 
  • Fresh coriander leaves for garnishing
Paneer

Let's Learn How to make this recipe:
  • Combine all the ingredients for marination and whisk well. Add oil ,gram flour and combine nicely. The mixture should be smooth and lump free. 
  • Add the paneer  pieces into it and coat them nicely with the mixture. Cover with a cling wrap and marinate the paneer for 30 mins in the fridge.
  • Heat  a non stick tawa or pan. Add a little oil and shallow fry the marinated paneer on all sides till brown . Remove them from the pan and place aside.
  • In the same pan heat rest of the oil . Add carrom seeds and once they crackle add the onion, ginger and bell peppers.
  • Saute on high heat for 2 mins . Now add chopped tomatoes, cover and cook until tomatoes become tender.
  • Mash with the back of the spoon and cook till oil comes out.Add coriander powder, cumin powder, red chilli powder and turmeric powder along with salt .
  • Cook for 30 secs. Add little water if the mixture dries up.You can add the leftover marination from the paneer to the gravy.
  • Add the fried paneer and cook for a minute.  Switch off the gas and sprinkle garam masala  , green chilies ad fresh coriander leaves.
  • Serve this with hot roti, rice or naan.
Paneer

The red, green and yellow bell peppers give a nice juicy, sweet and crunchy texture that compliments the softness of cottage cheese. This one is bound to impress and believe me your family will never know that this was a less than 20 mins job.


CREAMY WATERMELON GRANITA

$
0
0
Granita
Granita is the perfect refreshment when you're looking for an excuse to stick your face in the freezer every 30 minutes. Granita is much simpler than churned ice creams and sorbets and can be prepared with nospecial equipment. All you need to do is keep a sweetened puree in a container in the freezer, and occasionally scrape it up with a fork to form its granular to flaky consistency. This is frozen dessert at its most primitive, so the process of making it is really simple.
Granita
Granita is an Italian frozen dessert very similar to sorbet, except that it's made by hand instead of in a machine. Because of this, the texture of granita is coarser and flakier - like eating snow! It's briefly crunchy at the first spoonful and then melts deliciously in your mouth.
Granita
With all the ripe summer fruit around flooding the market, there is no shortage of possibilities that one can  try with Granitas.To make granita, you do nothing more than pour a fruity liquid into a pan, then place it in the freezer and use a spoon or fork to scrape the icy mixture as it freezes. It couldn’t be simpler, and there are so many different varieties: just make a liquid out of any fruit, pour it in a pan, and freeze it. Your Granita is ready.
Granita
I had shared a chilled melonballs salad with you the other day and I have the some leftover watermelon from that and see what I had been up to the whole week to beat the summer heat and keep myself cool. I will share the simple tricks of making this easy and quick coolers in other posts.
Coming back to Granita, I have tried the watermelon version. The gorgeous color of the watermelon shines through, and it reminds me of  the summer outside. The great thing about granita is that the light, scraped ice on top stays perfectly frozen in the freezer and  never crystallizes. It’s always light, cold, and perfect.
The exact recipe for the granita can vary depending on how ripe the fruit is, how sweet or sour it is, and how much liquid it holds. The ingredients for making granita is fruits, water and sugar. Combine all the ingredients in a saucepan over medium heat. Cook, stirring occasionally, until all the fruit has broken down into a pulp or alternatively, you churn the fruit in a food processor until it is pureed. Make a sugar syrup in advance and then stir it into the fruit puree.Either way, the end goal is a slightly thickened liquid with a consistency somewhere between orange juice and applesauce. To add more zing you can  add in any extra flavorings. I like to squeeze a lemon, a pinch of black salt, crushed pepper, mint leaves. You can also add chocolate chips, dry fruits and the possibilities with granite is endless.
Granita
Cuisine: Italian
Serves: 10 to 12
Prep time; 5 minutes
Setting time: 4 hours

Things you need to make this Granita:
  • 4 cups watermelon cubes
  • 1/4 cup lime juice
  • 1/3 cup condensed milk
  •  a pinch of black salt
  • a pinch of crushed pepper
  • 1/2 cup  raisins
  • lime wedges and mint leaves for garnishing
Let's learn how to make this Granita:
  • Place watermelon in container of food processor; pulse to puree watermelon. 
  • Place the strainer over a bowl, pour pureed watermelon into it to strain out seeds, forcing watermelon through with back of spoon, if needed. 
  • Stir  lime juice and condensed milk into pureed watermelon.
  • Add salt and crushed pepper and pour into a freezer safe pan until firm.
  • After half an hour, take the pan out of the freezer and scrap the granita with a fork. Put it back in the freezer. 
  • Continue doing this every half an hour or so until the granita is completely frozen and resembles fresh snow. Depending on how often and how vigorously you stir the granita, the texture can be flakier (less stirring) or finer (more stirring).
  • At this stage, you can either serve it up in individual bowls or lightly pack it into an air-tight container for later.
  •  To serve, scrape frozen watermelon mixture with spoon to make granita. Stir in currants and serve with lime wedges and mint leaves immediately.
Enjoy Your Granita........ an easy frozen dessert that celebrates the fabulous fruit . That's really all there is to it. Watch out for this space for some amazing recipes. 


MISA MACH POORA- GRILLED SHRIMP RECIPE FROM MIZORAM

$
0
0
Misa Mach Poora
The land of the Seven Sisters - Arunachal Pradesh, Assam, Manipur, Meghalaya, Nagaland, Mizoram and Tripura - is home to India’s largest collection of tribals who migrated to our peninsula, through the centuries via Myanmar. The prominent tribal groups include the Nagas, Khasis, Jaintias, Mizos, Boros, Garos and Kacharis. Each group maintains its own identity and culture of language, art and culinary specialties with their integral traditions forming part of their daily lives.
Misa Mach Poora
The land of the Seven Sisters still remain the lesser explored states of India. Apart from spectacular tourism, the regions are also renowned for their interesting cuisine, an experience in itself. From strong flavours to colourful dishes, the food of the northeast will definitely satiate a true foodie's palate. Northeast India is home to some of the most exclusive and special spices in the world including the world renowned raja mirchi or bhut jolokia (Ghost Pepper) which is the hottest chilli in the world according to the Guinness World records. 
Misa Mach Poora
For this Foodie Monday Blog Hop we have decided to take up Cuisines from North Eastern States - the cuisines of the frontier states of Arunachal Pradesh, Assam, Manipur, Meghalaya, Mizoram, Nagaland, Sikkim and Tripura and  the myths that surround Northeast Indian food. With my limited knowledge, when I was searching frantically for the recipes, I realized that the very  items that, for most of us, define Indian food: oil and masala and Northeastern food will have none of it. Bland, but also hot; pungent, but also aromatic; healthy, but also fatty—these adjectives can all be used to describe a meal from the Northeast, which is incomplete without a steaming platter of rice and various green vegetables. The food and lifestyle of Northeastern people are very simple. They take what is locally available and turn them into simple and tasty meals. There is no overabundant use of oils and spices. In some states, like Mizoram and to some extent Nagaland, the use of oil is almost non-existent as also that of salt. 
Misa Mach Poora
I came to realize that While Manipur is known for its fish delicacies, Nagaland is better known for its bamboo and meat fare. Mizoram mainly has boiled and subtle preparations rather than the fried foods. Sikkim and Arunachal Pradesh are more strongly influenced by our eastern neighbor  like China. This influence can easily be seen in their version of momos and noodles, but again without much influx of spices. Tripura's cuisine is evidently influenced by the mainland and is known for its bursting masalas. Assamese food is well known for its tangy flavours brought in by the extensive use of tomatoes and various citrus fruits for example Masor Tenga. 

While searching for the recipes, I find very little is known about the cuisines and there are very few online resources. While I have a good knowledge of Assamese cuisine thanks to my friend who have gifted me a book on it and I found so much of similarities in our cooking style and techniques and I almost relate to all of the recipes except the use of khar (traditional alkali) which is so typical to Assamese cuisine. This time I want to explore other cuisines besides Assamese Cuisines and stumbled upon this Shrimp recipe from Mizoram and did not find any other shrimp recipes list for rest of the states. Since my son like shrimp a lot, I decided to go ahead with this shrimp dish from MIZORAM. 
Misa Mach Poora
Mizoram is one of the seven Northeastern sister states sharing a border with Assam, Manipur, Tripura and an international border with Bangladesh and Burma. Mizoram means “land of the hill people”, mi means people, zo means hill and ram means country.Cuisine of Mizoram is similar to that of its other northeastern sister states and different from most of the mainland cuisine. Rice is a staple food served with fish, chicken, pork and duck. Meat and seafood are added to pretty much everything that is cooked. Mustard oil is used for cooking. Very little oil and spices are used and food tends to be bland. Vegetables are also used extensively unlike the common belief that Mizos eat only non-veg.
The food of Mizoram has a characteristic blend of Chinese and North Indian cuisine; thereby giving it a distinct flavour and taste. The dishes in the Mizoram food platter mostly include non-vegetarian preparations. Vegetables are also eaten along with meat. The food is served in banana leaves maintaining their age-old traditions. The local people here love to eat fish, mostly cooked or sauteed in mustard oil, which has a distinct flavour. Mizo people like bamboo in their food and also enjoy preparing delicacies made with duck meat.

Most popular dishes from this state are Misa Mach Poora, Panch Phoron taarkari, Dal with egg,Grilled shrimps. A meal in mizo will contains the following dishes for sure Vawksa ( smoked pork),Samtawk, Bai ( soup), Hmarcha Rawt ( Chilli chutney),any kind of Chhum ( Salad) and BehiiangChhangban Leh Kurtai  sounds exotic but  is a simple dish in itself. Made from rice flour and jaggery ,covered in leaf steamed into a delectable healthy and tasty treat from Mizoram.
 
The primary staple food of the Mizoram people is rice while the most common non-vegetarian food item is fish. Mustard oil is the most preferred medium of cooking for most Mizoram food items. However, the dishes are cooked with the least amount of oil. Bamboo shoots are among the most used vegetables in Mizo cuisine and among meats, ducks have a special place.Boiling, steaming and sautéing are the most preferred cooking methods followed in Mizoram cuisine, as the whole motive is to retain the maximum possible nutritive value of the ingredients.
Misa Mach Poora
In Mizoram people do like to include plenty of vegetables but they also add a meat to each and every dish and make it Non veg.The food in Mizo is quite similar to other north eastern states , Generally mild and some of ingredients used are punget in flavor.The staple is rice here, and they don't forget to include fish in their meal.Zero oil or very less oil is used in most of the recipes here. 
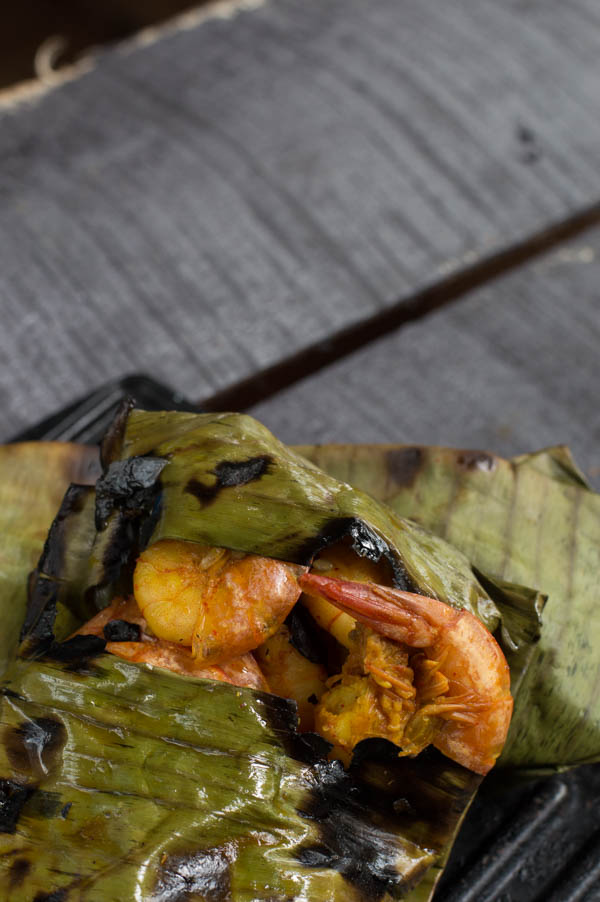
Misa Mach Poora is a popular dish from the northeast cuisine which is very easy and simple to prepare with just few ingredients on hand. Grilled shrimps are a sure way for an awesome delectable and luscious dinner; irresistibly marinated with subtle flavours, ready to be eaten with a bowl of hot rice.  If you love seafood, this Mizo dish is made for you. This is a dish traditionally made by grilling or roasting the shrimp on banana leaves placed on hot charcoals. The shrimp is flavoured with local spices and served with steamed rice. The sheer simplicity of the dish is what makes it so comforting to the soul. Most of the sources for this recipe online sites had onions in the ingredient list and none mentioned it in the preparation.So I have followed the recipe of Misa Mach poora from Here. The recipe was basically of Grilled Shrimp and served with Steamed Rice. I have made the recipe as per the instruction and after that I have used the grilled shrimp to make an Orange Glazed Shrimp curry that goes very well with the hot steaming pot of rice.
Misa Mach Poora

Total Time: 20 minutes
Prep Time: 10 minutes
Cooking Time : 10 minutes
Serves: 4 
Ingredients:
Misa Mach Poora
  • 500 grams Shrimp
  • ¾ tsp. Salt (½ for marinating and ¼ while grilling. adjust to taste)
  • 10 to 12 Peppercorns
  • 1 tsp. Coriander Powder
  • ½ cup Water
  • 1 tsp. Mustard Oil
  • ¼ tsp. Pepper Powder (adjust to taste)
  • 1 – 2 tsp. Lime Juice
Orange-Glazed Shrimp
  • Zest of one orange
  • 3/4th cup fresh orange juice 
  • 3 tbsp. lime juice
  • 1 tsp. hot red pepper sauce
  • salt as per taste
  • 1 tbsp. sesame seeds
  • 1 tablespoon oil
  • Grilled prawns from above
  • 1 Onion finely chopped
  • 6 to 7 garlic pods minced
  • 1 to 2 green chillies finely chopped
  • 1 teaspoon pepper powder
  • Spring onions and fresh coriander leaves for garnishing


Preparation:
  • Peel, devein and clean the shrimp.
  • Marinate the shrimp with ½ tsp. of salt and ½ tsp. of turmeric powder. Let it marinate for about 5-10 minutes.
  • Boil water in a sauce pan with peppercorns . Boil just enough water to merge the shrimp in it.Add shrimp and cook for 2 minutes.
  • Drain the water and transfer the shrimp to a bowl.
  • Pour ½ tsp. of mustard oil on the shrimp, mix it and keep it aside until ready to grill.
  • Make a paste of coriander powder and pepper powder with the help of 1 teaspoon of mustard oil and keep aside. 
  • Place the banana leaf over a slow fire to make it soft. Marinade prawns with coriander and pepper paste and place on the banana leaf. Wrap the banana leaf tightly and secure with  a toothpick or banana stem thread.
  • I have wrapped  the banana leaf with silver foil and placed it on the grilled rack over the stove. If you do not have banana leaf, you can place the shrimp on the pan and grill it on both sides until the shrimp is roasted. This should take about 5 minutes. 
  • Take out the prawn after 5 minutes and open the silver foil and the banana leaf.
  • At this stage you can squeeze lime juice and serve it as a side dish with rice or as an appetizer or with some cocktail.
  • Or you can prepare a orange glazed syrup by stirring  together orange zest, orange juice, lime juice,  hot pepper sauce and salt .
  • In a pan, and some oil and stir in the sesame seeds, chopped green chillies and garlic and saute for a minute .
  • Add the chopped onions and fry till translucent. Stir in the orange syrup and bring  to a boil until thickened, for about about 2 minutes on high flame. 
  • Stir in the grilled  shrimp along with ground pepper and toss everything well.
  • transfer to a plate, sprinkle spring onions and fresh coriander leaves and serve over some hot steamed rice.
Misa Mach Poora
Sending this recipe of Misa Mach Poora to 29th Foodie Monday Bloghop theme of "Cuisines from North East"......


KIWI CUCUMBER COOLER

$
0
0
 Cucumber
 A pitcher of cool, refreshing kiwi and cucumber makes any summer party a little more special. This refreshing cooler can be prepared up to a day in advance. This drink is  incredibly refreshing and cooling and perfect for picnics, cookouts and hot days at the beach. So, in the spirit of summer, hot weather and all things cool and refreshing, I’m sharing this thirst-quenching Kiwi Cucumber cooler recipe  to cool down the hot summer. 
 Cucumber
Beautiful, fresh and cooling kiwi Fruit & Cucumber Juice is loaded with Vitamin C and a good helping of zinc among many other goodies. Cucumber is just amazing for cooling us down from the inside out, and to add to that - being an amazing cleanser, it is just wonderful for our hair, skin and nails. Cucumber is one of the most alkalizing and hydrating foods we can have, whether we eat or add to our raw food green juice.Kiwi fruit is loaded nutrients too high in calcium, magnesium, potassium, sodium, vitamin C, beta carotene... and an awesome antioxidant.
Cucumber
Recipe Type: Beverage
Prep time: 10 minutes
Serves:4

Ingredients:
  • 4 kiwifruit
  • 2 large cucumber 
  • Juice of 1 lime or 3 tablespoon lime juice
  • 3 to 6 teaspoon of sugar syrup or honey
  • 8 to 10 fresh mint leaves
  • 400 ml or 3 cups of chilled  water 
  • 1 teaspoon Black salt
  • Lime , Cucumber wedges and few mint leaves for garnishing
  • Ice cubes and crushed ice to serve
Cucumber

Let’s Learn How to make this recipe:
  • Peel and roughly chop the kiwis, retain a few slices to garnish. Clean and cut the cucumber into round pieces, retain a few slices for garnishing  and blend the rest in a food processor along with the kiwi pieces.
  • Strain the mixture through a strainer and keep aside. Add the lemon juice, sugar syrup, salt and 4 cups of chilled water to the kiwi cucumber mixture and pour in a pitcher.
  • Roughly crushes the mint leaves and add to it. Add sliced cucumber and kiwi in it  and while you prepare the glasses, keep this mixture in the freezer.
  • To serve, place a few mint leaves at the bottom of the glass, then fill the glass with crushed ice. Pour the kiwi cucumber cooler carefully to  fill up the glass . Garnish with lemon slices and a sprig of mint leaves and serve immediately with a stirrer.
  • Serve absolutely chilled.

 Cucumber
For other summer coolers you can also try the following: 


THANDAI - HOW TO MAKE THANDAI MASALA AT HOME

$
0
0
Thandai
 Thandai is a rich and nutritious drink that originates in the northern India. It is enriched with different nuts, dry fruits and some mild spices and  rose petals. One sip of such Thandai and your taste buds goes on a roller coaster with all different tastes swirling and twirling in your mouth.In India Thandai is usually made during the festivities of Holi, but is a nice beverage to have throughout the year.There are many exotic spices that go into the making of this beverage, which makes it a highly nutritious beverage with a cooling effect on the body. This makes Thandai a perfect summer drink.The combination of many spices including peppercorn, fennel, cardamom and exotic dry fruits like almonds, pistachios that are infused with the milk to make it a healthy beverage.
 Thandai
 You can make this Thandai Mix Masala in the comfort of your home and use it anytime that you wish.This fresh, homemade Thandai masala tastes absolutely heavenly, far superior to the readymade mixes available in the market. The aroma of fennel, cardamom, pepper and saffron enhances the dense flavour of fully boiled milk, to pamper the senses and rejuvenate the spirit. You can strain the mixture before serving if you want it smooth, but if you like the coarse mouth-feel of ground almonds and poppy seeds, you can enjoy the drink as it is without straining.
Thandai literally means something that lowers the temperature or cools. Thandai can be served along with breakfast or as a mid morning or evening drink. It is loaded with a lot of health benefits such as :

  • Almonds, fennel and poppy seeds are rich in antioxidants. Poppy seeds or khuskhus,  is a very good source of zinc which helps in strengthening the immune system.
  • Fennel and cardamom helps to ensure a smooth digestion.

  • Milk and almonds are fantastic sources of Calcium, required for healthy bones and teeth.
  • Almonds are considered as brain food as they help in growth and repair of brain cells. Poppy seeds also are very good for brain as they are rich in iron, copper and zinc. Both help in the regulation of neurotransmitters and development of neurons.
Thandai
Recipe Type: Condiment
Prep Time: 10 minutes
Yields: 1 small jar

Ingredients: 
  • 25 Almonds 
  • 20 Cashewnuts 
  • 30 Pistachios 
  • 3 tablespoons Melon seeds
  • 3 tablespoons Poppy seeds 
  • 2 tablespoon fennel seeds
  • a few strands of Saffron 
  • 8-10 Green cardamoms 
  • 20-25 Rose petals 
  • 8-10 Black peppercorns 
Let's learn how to make Thandai masala at home:
  • Heat a pan and add  almonds, pistachios, cashews, pumpkin seeds and  dry roast for 3 to 4 minutes on a low flame. Remove and keep aside in a plate or tray. 
  • In the same pan, add the saffron strands ans stir till the color of the saffron changes to a darker shade. Then remove and keep aside.
  • Once the dry fruits cool, add everything in a dry grinder jar, including rose petals, fennel, black pepper and cardamoms. 
  • Grind to a coarse to fine powder as per taste. I have kept mine a little coarse. 
  • Remove from the grinder and keep in an airtight container or jar
  • Store in the fridge to be used later. if stored in fridge, it can be used upto 1 to 2 months.
     Thandai


    Chicken Rezala Recipe

    $
    0
    0
    Chicken Rezala
    Chicken Rezala is very popular and authentic dish originated in Bengal and highly influenced by Mughlai cuisine.This royal dish is simply magical with it’s delicious aroma, texture and lip-smacking taste. The chicken is slow-cooked in a white cashew nut gravy with a blend of aromatic spices which lends a divine flavour to this dish. It has a perfect blend of sweetness and sourness in a mildly spiced gravy which makes it just delectable with Naan, Roomali Roti or Paratha . The juicy succulent pieces of meatdrowned in  silky  white semi thick gravy which glides through your taste bud without being heavy, besides bringing that  perfect balance of sweetness  and  heat.
     Chicken Rezala
    Chicken Rezala has so much of complex flavours and layers of taste,which makes it is so distinctive from other Mughlai dishes. The secret behind a successful Rezala is the use of homemade sweet yogurt that nicely compliments the dish giving a nice sweet taste. Though Rezala is synonymous with mutton, some can also prepare it with chicken, mushroom, paneer, fish egg or prawn. The white gravy is made with curd, cashew nut and poppy seeds paste, flavored with subtle spices which are not commonly used in normal dishes. Apart from cardamom, cloves, the dish is spiced with nutmeg powder, white pepper powder and got contrasted by whole dry red chili and garnished with ghee/ clarified butter.

    Chicken Rezala

    Unlike other Bengali delicacies which has travelled to far away land, Rezala remain confined to the geographical boundaries of Kolkata.The long period of Muslim rule in the country has greatly influenced the architecture and cuisine of the country and Bengal was no exception.The most interesting thing about this recipe of chicken rezala is the uses of few chosen spices, slow cooking and uncommon blending of onion with curd used for marination as well as for cooking.  I have arrived at this recipe after going through many recipes on internet and food magazines, but a special mention to my friend Piyali Muthha from mytrystwithfoodandtravel whose Chicken Rezala has tempted me to try this and blog about it.

    Cuisine: Indian 
    Prep Time: 30 minutes
    Cooking time : 20 to 25 minutes
    Serves:4
    Ingredients
    For the Marination:
    • 4 nos of Skinless Chicken leg pieces 
    • 2 Medium Size onion 
    • 4 to 5 large Garlic Pods 
    • 1 inch Ginger 
    • 1 cup Fresh Curd 
    • 1 teaspoon White Pepper powder
    • 1 teaspoon Nutmeg Powder 
    Whole Garam Masala
    • 4 Green Cardamom 
    • 1 Black Cardamom 
    • 4 Cloves 
    • 8 Black Peppercorn 
    • 2 Red Chili 
    • 1 Bayleaf 
    Other Ingredients:
    • 2 teaspoon Ghee/Clarified Butter 
    • 3 teaspoon Refine Oil 
    • 8 whole Cashew Nuts 
    • 1 tablespoon Poppy Seeds  
    • 1 teaspoon Sugar 
    • A few strands Saffron

     Chicken Rezala
    Let’s Learn How to make this Chicken Rezala:
    • Soak the poppy seed and cashew nuts in warm water for minimum 30 minutes.
    • Wash the chicken and drain all water from it. Make cuts in the chicken pieces with a sharp knife so that the marinade will soak through it. Keep aside.
    • Boil the Onions till done, let it cool. When cool, drain the water and  grind along with ginger and garlic together in a blender to make a smooth paste.The paste has to be absolutely smooth. 
    • Using a whisk, beat the curd to make it smooth.Grind cashew and poppy seeds to a paste and keep aside. 
    • In a bowl mix onion,ginger garlic paste and curd. Add nutmeg and pepper  powder. Add salt to taste. Add the chicken pieces to the mixture and marinate. Keep it aside for minimum 30 minutes . 
    • Heat the oil. Lightly pound the whole spices so that it can release it’s aroma  and add to the oil. Let it sizzle with lovely aroma. Now put the marinated chicken pieces and sauté  on medium  heat  till all sides turn white. Now pour in all the marinade and Cook for 8-10 minutes.
    • Add the poppy and cashew seeds paste and  cook for a minute.Pour 3/4 cup warm water. Check the seasoning and cover. Let it simmer on low heat till oil starts to float on top and the chicken is cooked through.
    • Uncover and add the sugar and strands of saffron . 
    • Before serving heat 2 teaspoon of ghee or clarified butter and add the dried red chillies. lower the flame and let the ghee infused with the flavor of red chillies. Pour this over the curry and keep covered till you are ready to serve.
    • Serve with Naan, Paratha.,  Kulcha or Roomali Roti etc.
    Chicken Rezala

    Sending this recipe to Cooking from cookbook challenge for the month of March.
    You can also try other chicken recipes like 

    PATRANI MACHCHI

    $
    0
    0
    Imagine a fish that is coated in coconut chutney, wrapped in banana leaves and steamed, this dish is one of the hallmarks of Parsi cuisine -  influenced by the fine blend of Gujarati and Persian cooking. No Parsi celebration is complete without their most famous and mouthwatering dish Patra ni Machhi, which literally means fish in leaves, and in this case refers to pomfret wrapped in a banana leaf. It is an absolute standard on every Parsi festive menu and must come from the community"s seafaring and coastal days.
    Parsis are a community of Zoroastrians who made their home in the western borders of South Asia (Gujarat and Sindh in India) somewhere during the 10th century.Parsis are famously known for their enjoyment of life and have a saying:"Khanar pinar ne khodai apnar."  God gives in abundance to those who eat and drink.But you don't have to been a Parsi to fall in love with a dish as flavorful and refreshing.
    Patrani Machchi
    Though very similar to the Paturi or Patrapoda that we make minus the Mustard and plus a few other ingredients. To us the spice would be predominantly Mustard paste while to a Parsi it would be a green chutney consisting of predominantly coriander leaves, coconut. While the Paturi is made of Bhetki or Hilsa, the Patra ni Machchhi is made of Pomfret,Either a Bengali Paturi , Odia Patra Poda or a Parsi Patrani Machchhi...all these are subtly flavoured fish delicacies of their  respective communities.
     Coming back to the Patra ni Machchi, the preparation is made by marinating the fish in a coating of spicy green coconut chutney and wrapping it in banana leaves.  The fish is steamed to ensure that the flavors and juices of the fish and chutney are sealed in the banana leaves packet.Going with the theme of Microwave Cooking for our 30th Foodie Monday Blog Hop , nothing seems more appropriate than this Patra ni Macchi recipe which calls for it to be filleted and stuffed, then parcelled in banana leaf and steamed.

    Now a days intense time pressures do not allow the slow way of cooking practiced in earlier days. One device that has defied the clock in the Kitchen is the microwave oven. Now is it possible to cook delicious Indian food in microwaves? Yes, it is very much possible to do your everyday cooking in Microwave. Unlike the conventional Indian food, microwave cooked food is low calorie. The process of cooking the food is clean and efficient. One can serve the food in the same vessel one cooked food in saving us a lot of chores and time.
    Patrani Machchi
    Cuisine: Parsi
    Prep time: 45 minutes
    cook time:5 minutes
    cooking Medium : Microwave Mode
    Serves:2
    Ingredients
    • 2 whole Pomfret fish
    • salt
    • ¼ cup lemon juice
    • 1 cup fresh coriander coarsely chopped
    • 4 green chillies chopped
    • ½ cup fresh grated coconut
    • 2 teaspoon cumin seeds
    • 6 to 8 large garlic cloves
    • 1 teaspoon sugar
    • curry leaves( Optional)
    • 2 nos of Banana leaves

    Lets learn how to make this recipe of Patra ni Machchi:
    • Cut and clean the fish. you can make fillets out of it or can cook the whole fish. If using the whole fish make some cut in the body of the fish, so that the fish can absorb the marinade easily.
    • Sprinkle salt and half  of the lemon juice over the fish and set aside for 30 minutes preferably in the refrigerator.
    • Grind the fresh coriander, green chillies, coconut, cumin seeds, garlic to a fine paste.Add salt, sugar and the remaining lemon juice and mix well.
    • Apply this marinade to the fish and set aside for at least 15 minutes in the refrigerator.
    • Cut out the vein of the Banana leaf with a sharp knife after it is cleaned and washed. Fold it lightly and toss it around on the burner for a little while, till it starts to wilt a little. This will make sure that the Banana leaf is softer and easier to handle and not hard and brittle.
    •  Place the marinated fish in the center of each banana leaf and smear rest of  the chutney on them.Fold in the ends to make a parcel.
    •  Place the fish parcels on a greased Microwave safe platter. Pour some water in another microwave safe dish which is larger than the one with the fish in it. Place the dish with fish parcel in them and microwave at 900W for five minutes.
    • At this point you will see the  banana leaves turning light brown.Serve immediately with a steamed bowl of hot rice.
    • Do not open the parcels while serving. Let the person eat by opening them.
    Sending this recipe to 30th Foodie Monday BlogHop theme of Microwave cooking....
    You can also see other Fish recipes like:


    Patrani Machchhi


    THANDAI PHIRNI

    $
    0
    0
    Thandai
    Phirni is a easy traditional Indian rice pudding like dessert which is prepared with full cream milk, basmati rice and sugar as main ingredients. The cooked rice milk mixture is poured into small earthern clay pots garnished with mixed nuts and edible silver leaf. You will find this easy sweet dessert prepared in the homes of Hindus and Muslims to celebrate festivals like Eid, Holi and Diwali. Phirni  has got it’s origins in the Middle East and has made its way to the Indian sub continent through the Mughals. 
    Thandai
    I shall never forget the first time I had made Phirni. I had never tasted anything quite so delicious, I remember thinking when shall be the next occasion where shall I be able to make this dish once again. The first time I made it I had set it in ceramic ware but later I learned that if Phirni is set in clay, it  absorbs some of the fluid from the Phirni and helps it set, contributes a very special flavor of its own, and also helps keep the Phirni cool — important because this is one Indian dessert that should always be served chilled. You can make a lot of variation with this Phirni by adding almonds, saffron, rose, Pistachios, Mango, strawberry and even chocolates. 
    Thandai
    While Holi is all about colours, like every other festival the celebration is incomplete without some delicious sweet dishes that will  keep your mood upbeat. Different delicacies are prepared in various parts of India to bring in the festival with great zeal and enthusiasm.  On the onset of Holi, the festival colors, you can try this ThandaiPhirni to serve your family and guests. 
    http://www.culinaryxpress.com/2016/03/thandai-phirni.html
    Ingredients
    • 1 liter full cream milk
    • 1/4 cup rice
    • 1/2 cup sugar
    • 1 teaspoon cardamom powder
    • 2 tablespoon Thandai Powder* 
    • Pistachios,  almonds, rose petals and few strands of saffron for garnishing
    *Thandai Powder : 1/3 cup almond ,2 tbsp cashew nuts, 1 tsp fennel seeds , 1 tbsp poppy seeds , 1 tbsp melon seeds, 1 /2 tbsp black pepper, 4 to 5 green cardamom, . Dry roast everything , coo and make a fine powder of it.

    Let's learn how to make the Thandai Phirni: 

    • Wash and soak the rice for 1 hour. Drain and pat dry on an absorbent cloth. Once dry, blend the rice into a coarse powder.
    • In a heavy bottomed pan; add the milk and bring it to a boil. Once it begins to boil, turn the heat to low and add the ground rice to milk. You will notice that the milk will begin to thicken.Keep stirring the milk while it is simmering. Once it starts thickening, add the sugar, cardamom powder .
    • Add the Thandai powder and keep stirring for another 5 to 10 minutes till the mixture attains its full flavor and has an almost pudding-like consistency.
    • Turn off the heat and allow it to cool completely. 
    • Pour this mixture into small earthen pots and refrigerate for 3 to 4 hours.
    • Serve with chopped pistachios, almonds, rose petals and saffron.

    Thandai


    Sending this Thandai Phirni to Holi Collective Recipes by Sonal Gupta of Simplyvegetarian777.


    BAKED MAWA GUJIYAS- HOW TO MAKE BAKED MAWA GUJIYA

    $
    0
    0
    Mawa Gujiya
    Any festival in India is incomplete without dessert. Holi is one such festival which is about a riot of colors and can hardly be complete without a hearty dose of mawa gujiyas – a recipe made with dough stuffed with a sweet filling mawa and deep-fried. Gujiya which is a fried crispy flaky pastry stuffed with sweet mawa filling is one of the staple dessert prepared especially on Holi festival. On this Holi, let us learn how to make gujiyas/mawa gujiyas at our home and serve it  with thandai, which is a delicious beverage. 
    Mawa Gujiya
    Gujiya, Karanji or Chandrakala is a very popular dessert which is prepared in most households during festive occasions like Holi, Diwali, Dushera etc. This sweet dish is a celebration of deliciousness in the festive season of Holi. Traditionally this Holi special gujiya is stuffed with Khoya/mawa, chopped almonds, walnuts, pistachios raisins, green cardamoms, and nutmeg to enhance the flavor . Gujiya is known as different names in different parts of the country like Kajikalayu in Andhra Pradesh, Nevries in Goa, Karachika in Tamil nadu, Ghughra in Gujarat, Karanji in Maharastra & Odisha, Chandrakala in northern part of India, They all are similar in making but have different ingredient in stuffing.
    Mawa Gujiya
    The outer layer is made from all purpose flour. While the stuffing is made from mawa, sugar and nuts. Gujiya is not an overly sweet dish. It has a crispy, flaky exterior with a cardamom flavored sweet filling. Today, am blogging Mawa Gujiya where khoya/mawa is used in place of sooji (semolina).  There are many different variation is stuffing recipes like made with sooji or dried fruits and jaggery. The authentic gujiya has stuffing of sweet mawa or khoya. Hence it is known as Mawa gujiya as well.
    Mawa Gujiya
      Gujiyas have come a long way now, and along the way, new shapes and fillings have emerged. You can try the croissant shaped savoury ones, the rich shahi gujiyas, the sweet samosas, the fragrant clove flavoured laanglata, the saffron tinged kesari ones, the coin purse-like potli gujiya and the phool gujiya, that are garnished with petals from the Lotus. 
    Mawa Gujiya
    But gujias can be calorie-rich due to the fact that it is fried and filled with mawa or khoya. If you are watching what you eat this Holi, and would like to cut back on the calories, you can try this Potli Gujiyas  which is not fried but Baked. This will help you keep the weight off this dessert and will allow you to enjoy it, minus the guilt.


    Cuisine: Indian
    Cooking Time : 30min
    Preparation Time : 20min
    Servings : 4-5 (makes 15-20 gujiya)

    Ingredients :
    For Outer Layer
    • 2 Cups All Purpose Flour
    • 4 tbsp Ghee or Oil
    • 1 tsp salt
    • water for kneading

    For Filling
    • 1 Cup Mawa/Khoya
    • 1 Cup jaggery
    • 1/2 tsp Cardamom Powder
    • 1/4 Cup  Grated Coconut
    • 2 tbsp Raisins
    • 1/4 cup powdered Cashewnuts
    • 1/4 cup powdered almonds
    • 1/4 tsp freshly grated nutmeg 
    Let's learn how to make mawa gujiya:
    •  For the pastry, sift the flour into a bowl and rub in the ghee with your fingertips till the mixture resembles breadcrumbs. Add one-fourth cup and one tablespoon of cold water and knead into a stiff dough. Cover with piece of damp muslin and set aside for fifteen minutes. 
    • If using frozen mawa, microwave for 20-30 secs or let sit on the counter for 20-30 mins to thaw. Once thawed, gently crush with your fingers making sure to break all the lumps for a crumbled mawa. If using freshly home made mawa, make sure it is crumbly before use.
    • For the filling, heat a non-stick pan; add the khoya and sauté for three minutes or till the fat separates. Set aside to cool.Add the cashew nuts, almonds and raisins, grated coconut, jaggery and mix well.
    • Divide the dough into equal portions and shape into balls. Roll out each ball into a puri.
    • Place one portion of the stuffing  in the middle  , lightly moisten the edges, and bring all sides together to make a potli like design as shown in the picture above.
    • This is not tough at all. Here you have to pinch it upwards and bundle them.It doesn’t have to be perfect,just make sure it sticks well so that it doesnt open up during the baking process. 
    • Preheat oven to 180 degree centigrade. Grease the baking tray or line a butter paper in a baking tray. Line the gujiyas in baking tray. Coat the gujia with ghee (clarified butter)  and honey. Bake for 18-20 minutes. After 10 minutes, turn the sides and brush with ghee and bake till they are golden.


    KADHI PAKORA RECIPE

    $
    0
    0
    Kadhi Pakora
    Kadhi Pakora/ Pakode or kadhi chawal literally means “fritters with yoghurt”. The dish can be savoured both on special occasions or as part of the everyday meal. Kadhi is one such recipe that reminds us  of homemade food. Served warm with fluffy steamed rice, papad and pickle I couldn’t think of a more satisfying meal. Rice is undoubtedly the perfect accompaniment for it. Simple to make, this yoghurt and gram flour based curry is full of flavour.
    Kadhi Pakora
    One of the reasons why I enjoy this  Punjabi Kadhi Pakora recipe is because it has a real tangy taste to it that enhances the taste of the pakoras brilliantly.You can have the kadhi alone minus the pakoras but when the pakoras are added to the gravy , it enhances the flavour of the kadhi  soaking all the spices.

    Cuisine: Punjabi
    Prep Time: 30 minutes
    Cooking time:20 minutes
    Serves:4

    Ingredients:

    For the Pakoda:
    • 1 cup besan
    • 1 medium chopped onion
    • 1 cup chopped baby spinach
    • 2 chopped green chillies
    • 1/2 tsp baking soda
    • salt

    For the Kadhi:
    • 400 grams sour curd
    • 3-4 tbsp besan
    • 1/2 tsp turmeric powder
    • 1 tsp garlic paste
    • salt
    • 1 tbsp coriander powder
    • 3 cups water 

    Foe the 1 st tempering:
    • 1/3rd tsp fenugreek seeds
    • 2 to 3 whole dry red chillies
    • 1 tsp fennel powder
    • a pinch of asfoiteda
    • 2 tbsp mustard oil

    For the 2nd tempering:
    • 1 tbsp ghee
    • 1 tsp cumin seeds
    • 1/2 tsp kashmiri red chilli powder
    Kadhi Pakora

    Let's Learn How to make Kadhi Pakoa recipe:
    • In a bowl take sour curd and whisk it well till smooth. Add gram flour, red chilli powder, garlic paste,turmeric powder, coriander powder and salt to the whisked curd.Add 2 cups of water and stir and mix everything again to make a smooth mixture without lumps.
    • Take gram flour in a bowl and add green chillies, baking soda and salt as required.Add thinly sliced onions and chopped spinach.Mix everything well and keep aside covered for 30 minutes to allow the onions to release water in the mixture. Depending on the water content in the onions, accordingly add water as required to make a thick batter. 
    • Heat oil in a pan or kadai. with a spoon or with your hands drop the pakora batter in the oil.when the pakoras are partly cooked, then turn over and fry the other side till the pakoras are crisp and golden.
    • Remove the fried pakoras and place them on a kitchen paper towel so that extra oil is absorbed. keep  them aside.

    Kadhi Pakora
    • In another pan or kadai, heat mustard oil. make sure to use a large bottomed pot so that while cooking, the kadhi does not spill. Add fenugreek seeds, a generous pinch of asafoetida/hing , whole red chillies and roasted fennel powder. 
    • Allow the seeds to crackle and change their color. Fry on a low flame, so that these spices do not get burnt. Then add 1 cup water so that the temperature will come down and now add the curd mixture. Stir very well. This way the curd will not split . 
    • Increase the flame to medium and bring the kadhi to a boil. Keep on stirring often so that the kadhi doesnot stuck to the bottom. Lower the flame and then simmer the kadhi for 8 to 10 minutes or till the kadhi thickens. f the kadhi becomes too thick, then add some hot water. Add the pakoras in the kadhi. Stir gently and let the  pakoras be soaked in the kadhi for 8 to 10 minutes.
    • Before serving, make the 2nd tempering .Heat the ghee in a small pan on medium heat. Once hot add cumin seeds and when it starts to sputter, turn off the heat and add  red chili powder. pour this on the simmering kadhi. Stir it well.
    • Serve with plain steamed rice.


    Sending this recipe to Cooking from cookbook challenge for the month of March.


    Eggless Thandai Cookies recipe- How to make Thandai Cookies for Holi

    $
    0
    0
    Eggless Cookies
    Holi – the festival of colours, marks the beginning of spring season and is celebrated in different parts of India though the  rituals and customs to celebrate this  festival vary from one region to another, the spirit of festivity remains the same. Traditional food plays a major role in such festivities, but have you ever thought of making some fusion recipes for Holi using the traditional ingredients . 
    Cookies
    If not, then come with me and take a tour of some of the fusion recipes I have tried like Baked MawaGujiyas and Thandai Phirni earlier and for the 31st Foodie Monday Bloghop theme of #Fusionthandairecipes , I thought of incorporating the famous thandai flavour in cookies, which everyone can have not only during Holi but also throughout the year. Learn how to make cookies at home , that to which Eggless Cookies recipe which are easy to learn and  can be made in Microwave. These Recipes which are easy, simple and can be made with available ingredients at home.
    Before I take you on a tour to the fusion cookies recipe , let me tell you my house was filled with the beautiful aroma from Thandai powder and the rose water which I have infused in the cookies .  Thandai is a very popular drink that is consumed during Holi which is made by grinding almonds, rose petals, fennel seeds, melon seeds and black peppercorns and adding it to milk. You can use the thandai syrup which is available  the market or you can make the Thandai Powder at home .
    Baking is one such activity which is very relaxing in nature and the outcomes are amazing.

    Recipe: Indian
    Prep Time: 1 hour
    cooking time:20 minutes
    yields:15 cookies

    Ingredients: 
    • 1 cup All Purpose Flour
    • 1/4 Tsp Baking Soda
    • A pinch of salt
    • ½ cup Powdered Sugar 
    • 100 Grams Butter
    • 1 tablespoon Corn Flour 
    • 2 Tbsp Rose Water
    • Pistachio slices for garnishing
    *Thandai Masala
    • ¼ Cup Almonds (lightly toasted)
    • 1 tbsp Melon seeds (charmagaz)
    • 12 – 14 Peppercorns
    • 1 tbsp Poppy seeds / Poshto / Khus khus
    • 1 tbsp Fennel seed /Saunf
    • ½ tsp Green Cardamom / Elaichi
    Thandai Cookies
     Let us learn How to make Eggless Thandai Cookies for Holi:
    • Lightly dry roast almonds, melon seeds, poppy seeds and fennel seeds. once cool, grind to a fine powder along with cardamom and peppercorn.
    • In a bowl sift together all purpose flour, cornflour, baking soda, salt, Thandai Masala.
    • Beat sugar and butter together with a hand blender on medium speed till creamy.
    • Add the flour mix into the sugar butter mixture. Now add rosewater to it.
    • Mix everything together to form a dough. Divide  the dough into two parts. Wrap in cling film and  keep in the refrigerator to chill for about an hour minimum.
    • After an hour take out the dough and with the help of little flour, roll into a round shape with thickness as per your choice.
    • Preheat the Microwave at 180 degrees C.
    •  With the help of a cookie cutter, cut out the cookies and arrange them in a greased baking tray keeping at least 1/2 inch gap between cookies .
    • Sprinkle some pistachio slices on top of each Cookies.
    • Bake in the convention mode of the microwave oven  for 15 minutes .
    • After 15 minutes, remove the cookies from the oven and place them on wire rack to cool.The cookies will firm up on cooling.
    • Once completely cool, store in an airtight container.
    Cookies
     You can use these Thandai Cookies for a wonderful gifting ideas. Sending this Fusion Thandai cookies to the 31st Foodie Monday Bloghop theme of #Fusionthandairecipes .
     You can also try these cookies & Biscuits Like:


    Macha Tarkari( Odia style Rohu Fish Curry)

    $
    0
    0
    Fishcurry
    Odisha, previously known as Orissa, is one state that is traditionally famous for it's mouth watering delicacies of rice, lentils, desserts and sea food. Odia cuisine is known for its simplicity and delicate treatment of various ingredients that goes into it. Odisha has a vast coast line along the Bay of Bengal and also has many rivers flowing within the State. Owing to this proximity, access to  riverine fish and its inclusion has become an inevitable part of Odia cuisine and majority of the people from Odisha are non-vegetarians and fish forms an integral part of their traditional cuisine.
    Fish curry
    Fresh water fish such as Rohu has a natural sweetness to it than the fishes from sea and that is what that makes all the difference to this Odia fish delicacy called Macha Tarkari/ Macha Jhola  which is sure to leave a lasting impression on your taste buds for a while. When I crave for some fish, this few ingredient Macha Tarkari / Macha Aloo Jhola( Oriya/Odia style fish curry with potato ) is the one I always prepare for my lunch. "Maachha" in Odia means Fish; "Aloo" means potato and "Jhola" refers to a thin consistency gravy quite typical to an Odia style fish curry).  If you are looking for a light, simple and different  fish curry, then this oriya/odia fish curry recipe is the perfect solution to your meal plan.This recipe is very close to my heart as it is still the same way I have been making as I was when I learnt it first. Though I love to experiment with food, but  rohu fish curry recipe reminds me of home and the little things that my mother does for me as a child make it so much worthwhile to try it as it is.
    Fish Curry
    Unlike the fiery spiced curries associated with Indian food, the Oriya/Odia food is usually subtle and delicately spiced using Panch-Phutana, a mix of five spices- Cumin, Mustard, Fennel, Fenugreek and Nigella (Kalonji) seeds.Mustard oil and mustard seeds are ingredients, which makes Oriya/odia food stand apart from other cuisines. Mustard oil has a typical pungent smell and it is usually heated to its smoking point to decrease its pungency.Mustard Oil is mostly used for frying fish and making fish curries since it imparts a very distinct taste to the subject at hand.
    Fish Curry
    Cuisine: Odia
    Prep time: 15 minutes
    Cooking time: 20 minutes
    Serves - 4

    Ingredients

    • 500 grams Rohu Fish
    • 2 medium  Potatoes
    For the masala

    • 1 medium  Onion
    • 1 small Tomato
    • 1 tsp Ginger - Garlic paste
    • 1/4 tsp panch phutan
    • 2 dry red chillies
    • 1/2 tsp Roasted Cumin Powder
    • 1 tsp Roasted Corriander Powder  
    • 1/4 tsp Garam Masala  
    • 1 tsp Turmeric powder
    • 1/2 tsp Red Chilli Powder
    • 1 bay leaf
    • 1inch cinnamon stick
    • 2 green cardamoms
    • Salt to taste 
    Fish Curry

    Let us Learn how to make oriya/odia fish curry recipe:

    • Wash the fish and apply  turmeric and salt to the fish. Marinate and keep aside for 15 minutes.
    • Chop the onions and tomatoes finely.
    • Peel and cut the potatoes into medium side wedges and apply turmeric and salt to it.
    • Pour some mustard oil and heat it to smoking point. Slowly add the fish pieces one by one and shallow fry them in batches. Take out the fishes and keep them on a kitchen towel .
    • Add the potatoes and shallow fry them in the same oil and keep aside.
    • Add bay leaf, cinnamon, green cardamom to the oil and when it starts to release it’s aroma, put a pinch of panch phutan .
    • Next add the onion and fry till it turns a little brown, add ginger garlic paste to the oil. Stir and fry the masala till the masala is cooked and there is no raw smell.
    • Add chopped tomato, potatoes, turmeric, cumin powder,coriander powder, chili powder and salt. Cook for few more minutes till the masala starts to leave oil at the sides.
    •  Add a cup of warm water ,cover and let the curry simmer on medium heat till potatoes get soft. Add fish to it and cook for 2 to 3 minutes on slow heat . Remove from heat and add the garam masala powder and chopped coriander leaves on top to garnish.
    •  Serve hot with plain rice. 

    Fish Curry

    For more fish recipes you can try: 

    Masor Tenga (Tangy Fish Curry)

    PATRANI MACHCHI

    DAHI MACHA- Fish Cooked In Rich Yoghurt And Mustard Paste


    Shrikhand-Creamy Yoghurt infused with custard apple and Cardamom

    $
    0
    0
    Shrikhand
    Shrikhand, creamy sweet hung curd, mildly flavored with crushed cardamom and saffron strands is  a  magical transformation of simple curd into a sweet delicacy befitting for GODs. That’s why "Shrikhand" is supposed to mean "Ambrosia of the Gods".  This traditional Indian dessert uses Low fat, rich and creamy Greek yogurt and involves no cooking and is a standard feature of many households especially in Gujrat and Maharastra. Shrikhand is generally flavored with saffron, cardamom or diced fruits and served with masala puri or as a standalone dessert
    Shrikhand

    If like flavored yogurt, then  this homemade  flavored yogurt – Shrikhand will surely satisfy your taste bud . The main ingredient for Shrikhand is hung curd. For shrikhand your curd needs to be thick and no water in it. For this, you have to tie the fresh curd in a cotton Or linen cloth to let the water droop down from the cloth. Keep tied for 3 to 4 hours Or overnight. Let the whey flow down. Now unwrap the cloth to use your hung curd. Hung curd is known as chaka in India.
    Hung yogurt is like a blank canvas and you can paint it with the flavors you want. If you like a fruit based shrikhand, just add the puree or the pulp of the fruit after blending the hung curd and blend everything again. You can add any fruit, dry fruits with sugar and yogurt to make your fruits shrikhand. One of its most popular variations is  aam Shrikhand or Amrakhand where mango puree is added to this dessert . I have already posted Amrakhand recipe earlier.
    As winter bids adieu and summer is fast approaching, this festival of colour known as Holi is round the corner which has many dimensions to it than only colours. From celebrating the change of season, get together with families and friends and preparing delectable sweets and savories, this festival reminds us that there is no bigger and vibrant festival than Holi. To celebrate the #Festivalofcolors, the Foodie Monday BlogHop theme for this Monday was Colors associated with Holi and I have decided to keep my canvas blank and fill it with all the colors of Holi by making Cardamom flavoured Shrikhand and present it with a thandai based tart and topped it with fruits of my choice to represent the true colors of Holi. 
    Ingredients for the Thandai based tart.
    • 1 cup all purpose flour
    • 1/8th tsp baking powder
    • a pinch of salt
    • a pinch of nutmeg powder
    • 1/4th cup grated coconut
    • ¼ cup thandai powder/ syrup
    • 5 tbsp cold unsalted butter
    • 1/4th cup powdered sugar
    • cold water if you are using Thandai powder

    Ingredients for Cardamom filled custard apple Shrikhand;
    • 400 grams hung curd
    • 1 cup sugar
    • 1 cup custard apple puree
    • 1 tsp cardamom powder
    • few pistachios for garnishing
    For the garnish
    • Assortment of fruits like, banana, kiwi, grapes, red apple, orange, pomegranate, cherries etc.

    let's learn how to make this Shrikhand:
    • To make the thandai tart,  add all purpose flour, baking powder, nutmeg powder, salt and sieve well in a bowl.
    • Mix sugar and butter together till smooth and creamy add the thandai powder, grated coconut and mix well, add the all purpose flour, baking powder ,salt and nutmeg powder mix and make a dough using very little cold water. Water is not required for the dough if you are using thandai syrup. Cover it with cling film and keep it in the refrigerator for 30 minutes.
    • Preheat the oven at 180 degrees . line a parchment paper in a 7" tart mould . Take out the dough from the fridge and place it between two parchment paper. sprinkle some flour on it and start rolling it in a circular motion. Make a circle larger than your tart mould and take out the top most butter paper from it. Now carefully invert the dough over the tart mould and remove the butter paper. Press the dough as per the tart mould and place some cheakpeas over it which helps in retaining the shape and it won't puff up  and blind bake it the oven for 40 minutes.Take out of oven and keep on a wire wrack to cool.
    • Place yogurt in double layer cheesecloth/muslin cloth, gather up the sides and put the bundle in strainer over the deep bowl. Put in the fridge over night to drain.
    • Put drained yogurt, cardamom, sugar in the food processor. Mix well and adjust for sweetness.Add the custard apple puree to it and keep in the fridge to cool for 30 minutes or till you are ready to serve.
    • Pour the yogurt mixture over the crust and tap the pan gently on the counter to release any air bubbles.
    • Top the tart with your choice of fresh fruit or berries before serving.
    • Sprinkle nutmeg powder and pistachios on it and enjoy this fruity flavoured Shrikhand.
    Shrikhand
    Going by the color of the Holi , I have given a twist to the normal shrikhand by adding the subtle flavor of oranges, do give it a try and share your feedback.

    For Orange Shrikhand
    • 400 gms frsh thick curd
    • 11/2cup fresh orange juice
    • 1 cup sugar
    • 2 tsp orange zest
    • 10 seedless dates
    • To make Orange Shrikhand, add  orange juice, sugar in a sauce pan and bring to a boil  at medium heat for 15 min or till it gets a thick syrup consistency. To thicken it add dates puree to it and stir continuously during the boiling process. Turn of the heat and let it cool down. Once cool, grind to a fine purree.
    • For hung yogurt, tie the yogurt in a muslin cloth and hang it for about 2-3 hours or overnight in the refrigerator till all the water drains from it. Grind hung curd and orange puree at low setting till it you get a  smooth texture. 
    • Transfer the mixture in to an airtight jar and  keep it in the fridge for 2 hrs before serving.You can keep this orange Shikhand in the fridge for later use. Serve on small tarts and decorate with grated chocolate.

    Sending this to 32nd Foodie Monday Bloghop theme of ##Festivalofcolors.....

    Have a safe and colorful Holi....
    holi


    Viewing all 102 articles
    Browse latest View live